iWindows 10, praised for its adaptability and large feature set, is the operating system of choice for millions of people across the world. While it excels at a variety of activities, it may not be fine-tuned for maximum gaming performance out of the box. Gamers that want maximum performance and responsiveness from their devices frequently find it necessary to investigate numerous options for improving their gaming experience on Windows 10.
This detailed tutorial is intended to aid you in realizing the full gaming capabilities of your Windows 10 PC. You may make your computer into a powerhouse geared to handle the needs of current gaming by following a carefully crafted set of procedures and adjustments.
Also read: How to Choose the Right Gaming Laptop for Your Needs
These approaches can help you get the most out of your hardware by upgrading system software, installing the most recent graphics drivers, and tweaking power settings for optimal efficiency. Furthermore, we dig into regulating background operations, fine-tuning visual effects, and even studying advanced alternatives like overclocking for those who are acquainted with such procedures.
By the time you’ve finished reading and implementing these suggestions, you’ll have a Windows 10 environment that not only serves as a versatile computing platform but also as an exceptional gaming rig, providing an immersive and lag-free gaming experience that can truly elevate your gameplay to the next level.
Keep Windows Updated
The first step in optimizing your gaming performance is to keep your Windows 10 system up to date. Microsoft publishes updates on a regular basis that not only increase security but also raise system efficiency, remove issues, and improve overall performance. Here’s how to keep your system up to date:
- Open the Settings App: To begin, use the keyboard shortcut Win + I to open the Settings app. You may also click on the Windows Start button and pick the gear-shaped symbol that represents Settings.
- Navigate to “Update & Security”: Various settings are available inside the Settings app. Locate and choose “Update & Security,” which is often represented by a circular arrow icon.
- Select “Windows Update”: There are various tabs on the left-hand sidebar. Select “Windows Update.” This section is dedicated to Windows update management.
- Check for Updates: In the Windows Update section, there is a checkbox labeled “Check for updates.” Simply click on it. Windows will now search the internet for available updates.
- Install Any Available Updates: If updates are discovered, Windows will display them beside a “Download” or “Install” button. To download and install the updates, click this button and follow the on-screen instructions.

It is critical to check for updates and maintain your system up to date on a regular basis. These upgrades not only improve game performance but also safeguard your PC from security flaws. To guarantee that updates take effect, restart your computer after installing them. By keeping your Windows 10 system up to date, you’re building the groundwork for a more fluid and pleasurable gaming experience.
Update Graphics Drivers
Updating your graphics drivers is a critical step in enhancing your gaming experience on Windows 10. Driver updates are constantly released by manufacturers like as NVIDIA, AMD, and Intel to improve compatibility and performance with the latest games. Here’s a step-by-step approach to updating your graphics drivers:
- Determine Your Graphics Card:
Before you begin, you must know the specific model of your graphics card. This information is normally available in the Windows Device Manager or by consulting your computer’s documentation.
- Go to the Manufacturer’s Site:
Navigate to the official website of the manufacturer of your graphics card. NVIDIA (www.nvidia.com), AMD (www.amd.com), and Intel (www.intel.com) are three popular websites. Make sure you go to the correct page for your GPU brand.
- Find the Drivers Section:
Navigate to the “Drivers” or “Support” area of the manufacturer’s website. Graphics card manufacturers frequently include areas for driver downloads and assistance.
More options
- Look for Your GPU Model:
In the driver area, look for or pick your GPU model. To help you identify the correct drivers for your hardware, graphics card vendors frequently give search filters or dropdown menus.
- Download the Most Recent Drivers:
Following the selection of your GPU model, you should see a list of available drivers. Download the most recent driver for your graphics card and Windows version (32-bit or 64-bit).
- Install the necessary drivers:
When the driver download is finished, find it and double-click it to begin the installation procedure.
The driver installer will offer you with on-screen instructions. Accepting the licensing agreement, selecting installation choices, and confirming the installation are typical steps.
You may be prompted if you want to do a clean installation or update the current drivers during the installation. Choose the best choice for your requirements.
You may need to restart your computer after the installation is finished to effect the modifications.
- Check for Driver Installation:
You may verify the driver version in Windows Device Manager to ensure that the new drivers were successfully loaded. Select “Device Manager,” expand the “Display adapters” category, then double-click your graphics card. The new driver version should be visible in the “Driver” tab.
By following these steps and keeping your graphics drivers up to date, you can ensure that your graphics card functions properly in a variety of games, benefiting from increased compatibility and performance. This proactive strategy has the potential to dramatically improve your overall gaming experience on Windows 10.
Optimize Power Settings
Windows 10 employs balanced power settings by default to save energy. However, this may reduce the performance of your CPU and GPU during gaming. To optimize power settings for gaming, do the following:
If you’re using a laptop, right-click the battery symbol in the system tray, or press Win + X and select “Power Options” (if you’re on a desktop).
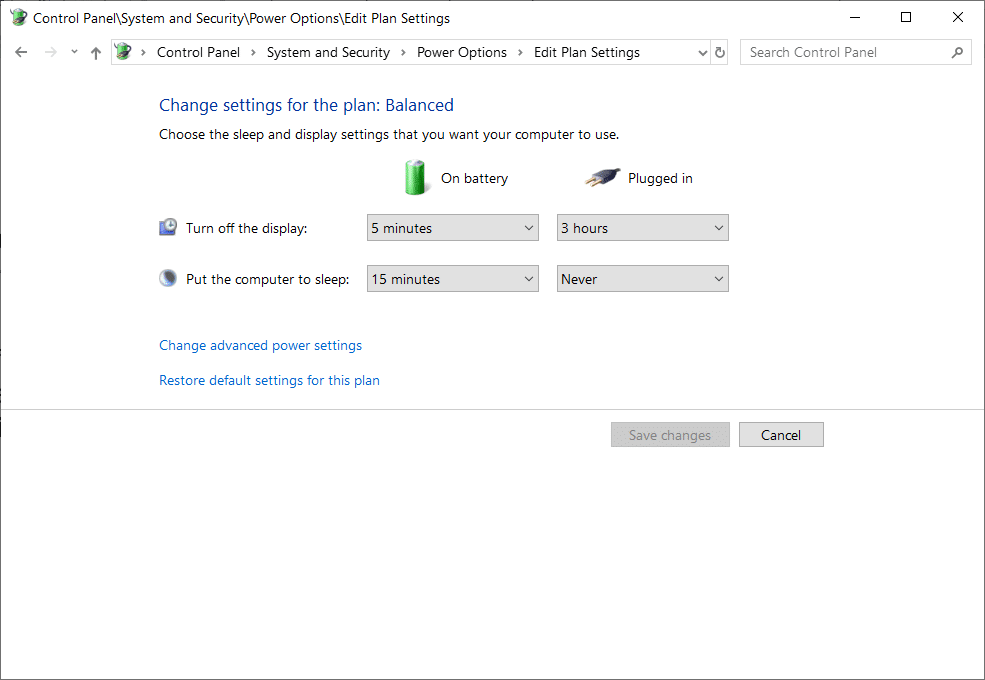
If available, select “High Performance” or “Ultimate Performance.” But If these options aren’t visible, go to “Additional power settings” and select “High performance.”
Disable Background Apps
Background programs and processes can eat system resources, resulting in poor game performance. Disable any needless background applications:
- To launch Task Manager, press Ctrl + Shift + Esc.
- Navigate to the “Startup” tab and deactivate any programs that you do not want to run during startup.
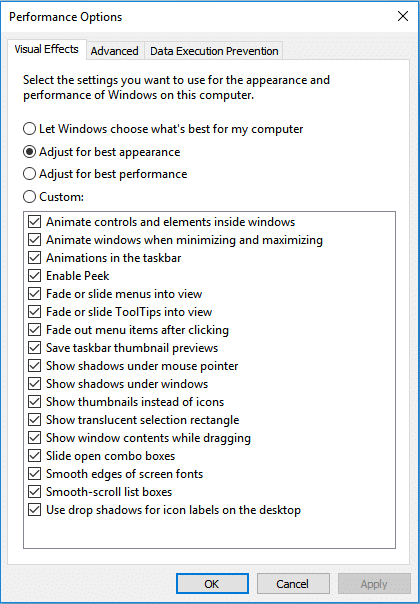
Adjust Visual Effects
Windows 10 has a number of visual features that, although visually beautiful, can have an impact on game performance. To change these settings, do the following:
- Right-click “This PC” or “My Computer” and then choose “Properties.”
- On the left, select “Advanced system settings”.
- Click “Settings” under the “Performance” section.
- Choose “Adjust for best performance” to disable most visual effects, or pick which effects to disable manually for a balance of aesthetics and performance.
Set Game Mode
Game Mode is a feature in Windows 10 that optimizes system resources for the running game. To enable Game Mode, follow these steps:
- Launch the Settings app (Windows key + I).
- Select “Gaming.”
- Choose “Game Mode” from the left-hand sidebar.
- Turn on “Game Mode.”
Disable Windows Update Delivery Optimization
Windows Update Delivery Optimization distributes Windows updates to other PCs through the internet, which consumes bandwidth and degrades gaming performance. To turn it off:
- Navigate to “Settings” > “Update & Security” > “Delivery Optimization.”
- Deactivate “Allow downloads from other PCs.”
Monitor and Manage Background Processes
You may monitor resource-hungry background processes in Task Manager (Ctrl + Shift + Esc) and terminate them if required. Check to see whether programs or processes are using CPU, memory, or disk space.
Overclock Your Hardware (Advanced)
Overclocking your CPU and GPU is an option if you have previous experience. This can significantly improve performance, but it should be done with caution to avoid overheating and instability. For further information, consult the documentation provided by your hardware vendor.
Keep Your System Clean
Maintaining a clean and well-organized system is critical for ensuring that your Windows 10 PC performs well, especially when gaming. Dust, clutter, and inadequate storage management can all have an influence on the efficiency of your system. Here’s a deeper look at how to keep your system working smoothly and clean:
- Clean Your Computer Components:
Dust accumulation within your computer can cause overheating and poor performance. Inspect your computer for dust collection on a regular basis and clean it as needed.
Turn down your computer and disconnect it from the power source to clean the interior. To clear dust from components such as the CPU cooler, GPU, fans, and motherboard, carefully open the case and use compressed air or a soft brush.
To avoid further accumulation, keep your computer in a clean, dust-free environment.
- Keep proper airflow:
Airflow is critical for cooling components such as the CPU and GPU. Ensure that no wires or other items are in the way of the fans or airflow channels.
What else
If your system becomes heated during gaming sessions, consider installing more case fans.
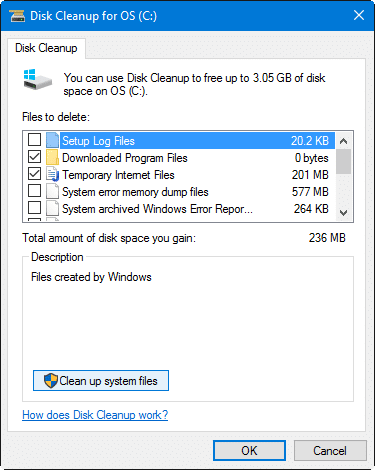
- Manage Storage Drives:
Maintain top performance by managing and optimizing your storage disks on a regular basis. Here are some pointers:
- Disk Cleanup: Use the built-in Windows Disk Cleanup program to delete unwanted temporary and system files from your hard disk.
- Defragment or optimize drives: Windows has a tool that optimizes your storage disks automatically. This process can be scheduled or done manually.
- Examine the Disk’s Health: Check the health of your storage disks on a regular basis with tools like CrystalDiskInfo or manufacturer-specific software. Replace faulty drives as soon as possible.
- Organize Files and Software:
- Maintain the organization of your files and installed apps. To free up disk space, uninstall software and games that you no longer use.
- To keep your primary drive from being congested, consider utilizing an external storage drive for larger files or games that you don’t usually use.
- Keep Your System Updated:
As previously said, updating your Windows 10 operating system on a regular basis will provide you with speed and security enhancements. This can aid in the smooth operation of your system.
- Temperatures should be monitored:
Keep an eye on your system’s temps while gaming by using monitoring software. If you discover that your components are running hot, try improving your cooling solutions or reapplying thermal paste.
By following these steps, you can keep your Windows 10 system clean, well-maintained, and optimized for gaming performance. A well-maintained system is less prone to overheating, slowdowns, and other issues that might degrade your gaming experience, allowing you to play your favorite games to their full potential.
Wrap up
You may improve your Windows 10 machine for gaming performance by following these instructions. Keep in mind that not all optimizations will work for every system, so you must try and tweak settings to find what works best for your hardware and gaming tastes. Have fun with your enhanced gaming experience on Windows 10!