If you root your Android device may give you more power and customization options, but it also comes with certain risks. It is important to follow the procedures carefully to avoid damaging your device or voiding your warranty. Note that the process may vary slightly depending on the type of smartphone you have and the version of Android installed. The following is a general method to root your Android device safely.
Also read: How to Transfer Data from Android to iPhone (or vice versa)
Prioritise data backups to avoid future loss. Check your device’s battery life and enable USB debugging in the developer options. If necessary, follow the manufacturer’s instructions to unlock the device’s bootloader. Select an acceptable rooting technique, such as Magisk or SuperSU, and download the necessary files. If necessary, connect your device to your computer, transfer the data, and reboot to recovery mode. Install the selected files and restart your device. Confirm root access using tools such as Magisk Manager, and be careful when handling privileged rights and making system changes.
Always remember that rooting is risky and may affect your warranty and security.
Before You Begin
Rooting your Android device can provide you with more power and flexibility over your smartphone or tablet. However, you must proceed with caution because rooting might result in problems and possibly data loss. You may assist in ensuring a smoother rooting procedure by following these steps and suggestions.
Prioritize the security of your data first and foremost. Rooting entails making extensive modifications to the system of your device, which can occasionally result in data damage or loss. Perform a complete backup to protect your vital files and information. Connect your device to a computer and transfer your data, or utilize cloud storage services to remotely store your backup. Having a backup ready will give you peace of mind, knowing that your data is safe even if the rooting process fails.
What else
Furthermore, a full battery is required for the rooting process. While the procedure itself may not require a lot of power, any interruption, such as a power outage, might result in an incomplete rooting attempt or even device failure. To avoid disruptions, make sure your device is fully charged or connected to a power source during the rooting process.

Enable USB debugging on your device before beginning the rooting procedure. During the rooting process, this step allows your computer to properly connect with your Android smartphone. To activate Developer Options, go to your device’s Settings, then About Phone, and then touch on ‘Build Number’ many times. Locate and enable the USB Debugging feature inside Developer Options. This is a critical step in creating a secure connection between your device and PC.
In some circumstances, some devices require you to unlock the bootloader before you root them. Remember that unlocking the bootloader is a complicated operation that may void your device’s warranty and wipe your data. To avoid problems, look for bootloader unlocking methods relevant to your smartphone model. If your device needs this step, carefully follow the instructions and understand the implications before proceeding.
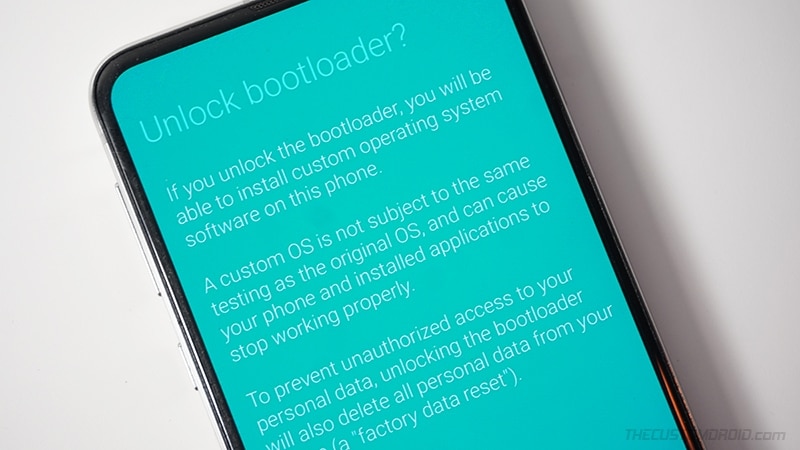
By diligently following these preparation procedures, you are laying the groundwork for a successful rooting experience. Backing up your data, charging your device, enabling USB debugging, and unlocking the bootloader if required are all essential steps in the rooting process. Each step helps to decrease possible dangers and difficulties, improving the overall experience, and protecting your device and data during the operation. Remember that patience and prudence are essential as you begin on this road to fully unleash the possibilities of your Android smartphone through rooting.
Rooting Process: Unlocking the Full Potential of Your Android Device
Rooting an Android smartphone provides access to customization and control that is not available through the normal operating system. Gaining root access allows you to delve into the nuances of your device’s system, enhance performance, and even enjoy previously prohibited functions. However, the rooting procedure must be approached with caution and accuracy. Here’s a detailed guide to navigating the many procedures required in rooting your Android handset.

1. Choose a Rooting Method:
When it comes to rooting procedures, two popular choices are Magisk and SuperSU. Magisk has grown in popularity due to its ability to provide root access while still allowing programs that normally refuse to run on rooted devices, such as banking applications, to function. SuperSU, on the other hand, while still widely used, may not be as actively developed as Magisk.
If you prefer Magisk, go to the official site and download the Magisk Manager APK. If you prefer SuperSU, get the SuperSU ZIP file from a reputable source.
2. Download Required Files:
Once you’ve opted for a rooting technique, download the necessary files – either the Magisk Manager APK or the SuperSU ZIP – to your Android device or to your PC for subsequent transfer.
3. Connect to PC (if using a computer):
If you’ve selected to download the files to your computer, connect your Android smartphone to your PC with a USB cord. This phase allows for the smooth transmission of files.
4. Transfer Files (if using a computer):
Transfer the downloaded files, whether it’s the Magisk Manager APK or SuperSU ZIP, to your device’s internal storage or an SD card for quick access throughout the rooting procedure if you’re using a computer.
5. Reboot into Recovery Mode:
Shut off your Android smartphone before entering recovery mode. The exact key combination depends on your device, but it usually involves simultaneously pushing the Power and Volume Down keys.
6. Install ZIP (if using SuperSU):
In recovery mode, use the volume keys to go through the choices and the power button to pick. Select “Install ZIP from SD Card” or a similar option, then go to the location where you saved the SuperSU ZIP file. Confirm the installation to begin the rooting procedure.
7. Install Magisk (if using Magisk Manager APK):
Magisk users should utilize a file manager to locate the Magisk Manager APK on their device. Install it like any other software to prepare for the forthcoming rooting processes.
8. Reboot Your Device:
After the installation is finished, restart your Android smartphone from the recovery menu. This step completes the rooting procedure and prepares your device for the additional capabilities that will be available.
9. Check Root Access:
Determine your newfound root access once your device boots up. The Magisk Manager app’s appearance and operation serve as signs of successful root access acquisition.
10. After Rooting:
After rooting, follow these procedures to ensure a smooth experience:
Install root management programs: These programs, such as “Magisk Manager”, give you control over root access and permissions, allowing you to better manage your device.
Be careful: Remember that with great power comes great responsibility. Without the proper understanding, changing important system files can lead to device instability or bricking. Customization should be approached with discretion.
Understand the security risks: Rooting your device may expose it to increased security threats. To avoid potential dangers, only give root access to programs you explicitly trust.
Back up regularly: Make a habit of backing up your device regularly to protect yourself from the unexpected problems that root access can occasionally cause.
Conclusion
Finally, rooting allows you to customize the way your Android smartphone works. However, it is a risk that needs to be taken with care. You can unlock the full power of your Android smartphone while ensuring its stability and security by choosing an appropriate rooting technique, installing the necessary files, following the step-by-step instructions, and following the post-rooting procedures.